Tuesday, December 18, 2012

Muscles Vegan Style!

Being lactose intolerant doesn't help if you want to build muscles for...let's say becoming a famous UFC fighter (though you need more than glamor muscles for that but let's not worry about that right now). The typical Whey protein option is not applicable here. So what's the alternative? Well I have tried Soy proteins but I am not a big soy fan and don't think it works well as a protein supplement.

Couple of weeks ago while browsing at a local natural pharmacy, I found something called PlantFusion, a plant based protein shake. The owner of the store swore by it. So I gave it a shot. And I have been impressed so far. Primary ingredients are peas, artichokes, and quinoa--all good stuff. It dissolves easily and is light on the stomach. There are few versions of plant-based protein shakes out there (try searching on amazon) but having tried couple of them, PlantFusion is my pick.

It comes in four flavors--Chocolate, Berry, Vanilla, and Unflavored. Honestly I think the berry flavor sucks big time. Having said that the Chocolate and Unflavored versions are my favorites. Primarly because I mix it almond milk (another source of protein) and some strawberries and bananas. The unflavored flavor works best here.

A friend of mine takes it to the next level, adding peanut butter to the mix as well. That's a tad bit too funky for me.

Though its high on protein, don't expect sudden muscle swell as would with typical Whey protein shakes. I believe it's because this shake doesn't have any Creatine in it that most Whey shakes do. You can buy Creatine mix separately but its known to bother people with IBS or other stomach issues.


Official Name: Plant Fusion

Price: $19.99-28.99 (depends on the store you find it at)

Where I bought it from? Vitamin World and from Natural Pharmacy in Owings Mills, MD

Product Site: Click here


Checkout the back label. The protein serving is fairly formidable. Typical protein bar is around 28-30g and this one rates at 21g.


I will report back in six months (or maybe a year or two or three...) on how close I am to punching my ticket to the UCF championship match :)


My next post will be on Cliff bars. Another amazing alternate to whey protein bars.

Saturday, February 25, 2012

Pad Thai "type" dinner anyone?

First off, after a long break I am back. I have been traveling a lot lately, which led to very little time experimenting with food :)

This past week there was a big winder storm advisory for DC. We were told there will be 5-6 inches of snow. Now to many of you that might not mean much but for us folks in the capital that is like shut-everything-down-and-hide-in-your-homes snow storm.

But nothing happened. It didn't snow, not even an inch. But I didn't know that so I decided I spend my President's day evening at home experimenting with a Thai recipe. Since I was feeling real lazy I didn't bother to look up a real recipe and decided to just wing it. And I am glad I did!

So while browsing the aisles at my local grocery store (Harris Teeter), I stumbled upon some real cheap Thai noodles. So I decided,  what the heck let me just make my own version of Pad Thai or something close to it. How bad can it be, right? Well with my experiments the outcomes can be, let's say interesting. But this wasn't one such case.

So I had noodles, I needed some protein. So I picked up a box of organic grilled chicken. Now I needed some vegetables. So I picked up some baby bok choy, been sprouts, shiitake mushrooms, spinach and some cilantro. Of course I needed a sauce. After looking through what seemed a million options of Chinese and Thai sauces, I chose Annie Chun's Pad Thai sauce.

So my grocery bag looked like this:

- 1 bunch of Baby Bok Choy
- 1 box of bean sprouts (though you need far less than box but that was the smallest option I found)
- Handful loose cilantro stems with leaves
- Handful spinach leaves
- 1 box shiitake mushrooms (my favorite kind)
- 1 bottle (small one) of Pad Thai sauce
- 1 box of Grilled Chicken strips

- 1 small pack of Thai rice noodles
- One of brown eggs (optional, you may or may not add this)

The total cost was around $22 with taxes. Alright that's a bit pricey for one person but the ingredients are enough for two people and bunch of stuff is left over for future use.

So here's my recipe for "it".

a) Let's start with the noodles first. In a deep pot boil some water (add some salt to it to get the water to boil faster). Add the noodles. It should not take more than 10-12 minutes for this to be done so keep a watchful eye on this while we prepare the rest of the ingredients.

b) On the side, warm up some olive oil in a saucepan and saute the chicken strips. Since these come grilled you don't need to saute them for too long. Maybe 3-4 minutes.

c) Clean and dice the shiitake mushrooms in strips. Throw in the saucepan to saute for a little while. I like my mushrooms a bit crispy so I did this for about 5-7 minutes but you can choose to do less.

d) Dice the baby bok choy leaves and spinach leaves and saute for 2-3 minutes. The bok choy leaves cook very quickly so be careful not to burn them.

e) Add some spices: Salt, Paprika (1/4 tbsp), Turmeric Powder (1/2 tbsp).

f) Throw in about half of the bean sprouts in the pan and let it settle. Don't over cook them though. Not more than 1-2 minutes.

g) Add about 1/4-1/2 cup of Pad Thai sauce and let everything simmer for 5 minutes.

h) While this is happening, scramble one egg with salt and pepper. I like to add some diced tomatoes and onions as well but that might make the over meal a bit heavy.

i) Add the scrambled egg in the main saucepan. Mix it well.

j) Drain the noodles and mix everything together to an extent that the noodles absorb the brown sauce color.

k) Some some cilantro leaves and bean sprouts to garnish the overall preparation.


The whole thing took less 20 minutes to make. For me that is a pretty important aspect. And honestly this tasted pretty good (I mean the sauce was ready-made so the chance to get this wrong is pretty low - just how I like it :)

Ideal for Sunday afternoon meal with a nice cold beer!

Sunday, December 18, 2011

Market Recommendation: A holiday treat

So this past weekend I was scanning the aisles of Whole Foods to find a holiday sweet treat. Something that would be lactose free and would not taste like raw chocolate. Most chocolate options that are dairy free are 60+% pure chocolate. I love my bitter chocolate but its nice to have variety, isn't that the spice (or sweet in this case) of life?

After being dejected by the cookie/chocolate aisles, I headed over to the bakery section. As I was walking closer to the shiny glass display units, it felt I had entered Willy Wonka's private collection room. Everywhere I looked there were amazing mouth-watering cakes, fruit pies, pastries, muffins and just about anything you can imagine that would be wonderfully baked. Excited, I started to scan the ingredients list. To my dismay not a single (zilch!) was made without Milk!!!

I knew it was too good to be true. Just to double check, I went back and read the ingredients again (of all 30 odd items). I decided to head towards the checkout line and head back home. But as I walking over I saw a shiny light over a red box, I couldn't make out what it was from far. As I approached closer to this beacon of shimmering glow, it slowly lit up as if it was calling me (it might have been old incandescent bulb that was flickering, but I am sticking with the divine intervention story).

I walked over and found my prize, Organic Chocolate Truffles! What could be more holidayesque than truffles. Apprehensive of finding milk on the list of the ingredients I quickly scanned the back of the box. I didn't see any that would remotely be a milk based ingredient. Convinced I had made a mistake, I looked again and again and again (I do that sometimes), only to find that it was indeed diary free (disclaimer: it is not certified dairy free though).


Official Name: Organic Chocolate Truffles

Price: $4.99

Where I bought it from? Whole Foods

Product Site: N/A (I couldn't find a direct to this product)


Bring one home today! 


When you open the pack you will see pretty oddly shaped pieces of truffles. But who cares when they taste the way they do. Usually with non-milk products you expect them to be thick and hard. But not this one. As soon as you bite into it, its just melts in your mouth (I sound like a Hershey's advertisement but its true). It is truly fluffy and filled with creamy (but not lactosey) chocolate in the middle.

Perfect sweet delight for the holidays. Enjoy!

Saturday, October 22, 2011

Recipe: Indian Pudding (Halva)

This is one sweet dish that I really missed once I had cut dairy out of my diet. I grew up eating this and have some really fond memories when my family enjoyed this together. My Mom would make it during most festivals, especially during the Navratri (9 nights of Durga prayers). Its celebrated a few weeks before Diwali and is commonly known for its Dandiya dance parties.

Halva (click on the link for a Wikipedia history lesson) as its traditionally known as in India, is a pudding made out of semolina flour. The original recipe calls for Ghee (clarified butter, which is usually low on lactose) and Milk (well its not). So today I present to you a modified version of this pudding that does not require Ghee or Milk but replaces it with Olive Oil and Soy Milk. Wait Wait, don't jump to conclusions yet. Trust me it tastes very very good. I have a very picky sweet tooth and I liked it, so chances are you might too.

Before we get to the recipe, I have to thank my Mom for it. Recently, she visited me in DC and during a festival made the Halva for everyone. Everyone except I ate it. I saw her sad face when she saw me not having some. Seeing her sad, I decided to man up and have some. But Mom's are Mom's! She asked me try something different the next day instead.

The following day she handed me a plate with the "new" Halva. I looked at it and thought that it looked the same. I wasn't sure if she got the fact that I can't eat dairy. But I couldn't say no to her again so I just ate some. I couldn't tell the difference. It wasn't until later when she revealed the "new" recipe.
 
All I can say is, I love you Mommy :)

Alright I am going to jump right into the recipe. If you unfamiliar with how it tastes and to get a quick history lesson, do read the Wikipedia article I linked above.

What do you need?

- Suji [also called Semolina flour] (1 cup)
- Extra Virgin Olive Oil (3/4 cup)
- Fine-grained Sugar (1 cup)
- Water (3-4 cups)
- Dry Fruits: Walnuts, Cashews, and Raisins (10-15 pieces of each)
- 1 Deep pot
- 1 Regular sized pot


How to go about this?

Step 3
1) Add the flour in a deep pot and about 1/2 cup olive oil to it

2) Keep stirring it so it becomes semi-thick. If needed, add some more olive oil (don't exceed the 1 to 3/4 ratio)

3) Keep doing the same (adding oil if needed) and stirring for another10-15 minutes, until the mixture is golden brown (see the image on the right)

4) Flour will start separating from the oil and will turn darker brown than the color shown in the image.  

Tip: You should keep the flame on medium initially and then high towards the end. This will allow the flour to darken without burning. Don't forget to keep stirring.

5) In the meantime, add 1 cup of sugar to a small pot along with 3 cups of water (maintain a 1 to 3 ratio).


Step 8


6) Let the sugar melt and form a syrupy mixture. This should not take more than 10 minutes

7) Once the syrup is done and the flour is darkened. Add the syrup to the flour mixture in the deep pot.

8) Start stiring as soon as you add it. The flour will absorb the water and become thicker.


9) As soon as the mixture is thick enough so that it is hard to stir anymore, it means you are done!

10) Cover the pot and let it stand for about 15-20 minutes. The oil will get cooler and the whole product will harden.

Tip: To make fun shapes out of it (as show in the image below), instead of leaving it in the pot, pour it in another pan of which you like the shape.

11) Garnish the product with diced dry fruits and you are done!

Here is the finished product. Looks fancy right? I feel like a real chef today :)


Saturday, October 15, 2011

Market Recommendation: How about a Gluten-free Pizza?

Yea Yea, I know that is not really a pizza. But if you are allergic to gluten, believe me this isn't that far off from the real thing.

So last week I was at Whole Foods looking for my trusted Amy's Cheese Less Pizza but it was nowhere to be found. The only no-cheese "pizza" available was the Whole Foods' Brand. The 365 Everyday Value Gluten-Free Pizza.

Since I had gone to Whole Foods for a pizza and darn it I was going to get one. So I tried my luck with this. I was surprised, it was really good! Unlike Amy's pizza which I make it in the microwave / saucepan, this pizza is recommended to be made in an oven. Now I am not much of an oven guy but I gave it a shot and must say it turned out pretty good.
Made with a rice crust with generous topping of roasted veggies, it tastes like ... well, bread with veggie toppings :) I mean that is what it is but it tastes good so who cares! The size of the pizza is pretty small, especially for four bucks! I won't recommend it as a meal but its perfect for an evening snack.


Official Name: Roasted Vegetable Pizza

Price: $3.99

Where I bought it from? Whole Foods

Product Site: N/A (I couldn't find a direct to this product)


Twist Time

I have a couple of tips. For the lazy people out there (that's me on most weekends), try it a generous layer of with smoked paprika hummus or with spicy red pepper hummus. Adding either of these types of hummus as a topping will provide the necessary kick to it.

For folks who are looking for a slightly better taste, try it with a topping of freshly chopped cilantro with fresh cucumber (peeled) and dash of black pepper. Add a layer of guacamole (or hummus) before
adding the above mentioned ingredients. It turns out to be a pretty satisfying snack.
 
P.S. 365 Everyday value is a Whole Foods owned brand and is similar "in-spirit" to other store brands but the difference is the quality. I believe it's quality is far superior to that of other store brands.

Thursday, September 8, 2011

Find of the month: Amazing Indian street food in DC

Last week I was at Union Station in Washington DC and was looking for some lunch. Now if you have ever been to Union Station you know it is huge station with at least 100 different restaurants in it. Ranging from full sit-down types to several food court options. Though all these options were standard chain type restaurants. Or so I thought.

Albeit some of chain-type restaurants have lactose free options, I was looking for something with a Twist :) I was about to give-up and was going to for one of my favorite chain restaurants, Chipotle, which is located next to the entrance of the West Hall of Union Station, but some activity outside the entrance doors made me walk towards the gates. Hold behold there was a full array of food stalls right outside the west hall doors. This little alcove had options from West Indian cuisine to farmers market style fresh fruit salads. But the one I was attracted to was an Indian food stall. Now most Indian food has Ghee (clarified butter), which has low amounts of lactose in it.


But I wasn't going to just walk away without exploring the potential. So I reluctantly asked the owner about anything she had that was dairy-free. I was surprised to hear a list of 4-5 things that didn't have any lactose in them. And man they were good. Now I didn't get to try all of them but the ones I did were pretty darn good.

Here is what I tried:

4 for $5 Somosas (Indian stuffed pastry)


Indie Veggie Roll - $7. Made right in front of you, its a roll of Roti, Indian flat bread, filled with pre-made fried vegetables, such as okra, cabbage, eggplant, potatoes.

Other than those, she listed Chicken Tikka as other options that were diary-free.

All I can say I love Chipotle but I am glad I found this place. I ate street food growing up, so in rare cases such as this one when it does work out in my favor, I am all for it. So if you are ever in DC and around Union Station, do drop by as it will be worth the trip. While you are eating the food enjoy the architectural beauty of the Union Station.


Name: Indigo

Where is it located: Outside the West Hall entrance to the Union Station. Look for Chipotle, the stall is right outside the doors next to it.

Tell them this blog sent you. No she won't give you any discount but it will make me happy :)

Wednesday, August 31, 2011

Market Recommendation: It's time for Belgium Waffles

Could it be vegan, could it truly be gluten free?

Yes and yes.

But it must taste like cardboard, right?

How should I put it ... if you mean cardboard that tastes like amazing Belgium Waffles that a grandma in Belgium made, then you are right it does taste like the cardboard. :)

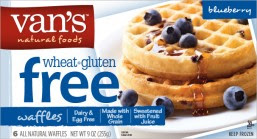
Say hello to my little friends--Van's Gluten Free Blueberry Waffles. Not much else to add. Just try'em.

Official Name: Van's Wheat-Gluten Dairy Free Blueberry Waffles

Price: $4.99

Where I bought it from? Harris Teeter, Whole Foods, Wegmans

Product Site: Click Here


Twist Time

Well they are waffles, so I'd enjoy them as any waffles should be. I love mine with 100% pure Grade-A maple syrup, fresh banana's, and blueberries or strawberries.

Check it out ... hmm tasty!

Thursday, August 18, 2011

Basics: Whey your options

When I started to cut lactose out from my diet, the first thing I did was to start reading the ingredients in the food items I was buying. This was really the first time I was paying attention to what was in the things I was eating. While going through the list, I would look for words like butter, milk, cheese, milk fat, etc.

But are there any other ingredients that don't sound like they are made from milk but they really are? Well I asked a close friend of mine who is Vegan and she gave me a few tips.

For example, how about Whey? Popular ingredient in energy bars and protein shakes. Unfortunately it does have lactose in it. Whey is left over milk coagulates.

So how about Cocoa Butter, it does have the word butter in it, is that lactose free?

Great news, Cocoa Butter is Lactose free. Amazing news for me as I love chocolate. I still can't eat most chocolate bars as they have milk fat in them, but there are several brands that use Cocoa butter instead.

So moral of the story read the ingredient list and Google the words you are unsure of.

Sunday, August 14, 2011

Recipe: Mint Chutney

This is a recipe from my Mom. I grew up eating this but for never bothered to learn how to make it as I used to get a frozen version from Indian Stores. But the frozen versions contain yogurt in them so aren't lactose free. Recently when my Mom was visiting I made this with her and jotted down the secret recipe. I think this recipe is a Godsend for me so I am going to share it with you all too.

Takes less than 30 minutes from start to finish. You can make this in big batch and freeze the majority. At regular refrigeration (not frozen) it stays fresh for up to 1-2 weeks. Frozen it can say fresh for months.


On the left you see the picture of exactly what I made. 

In case you are wondering. The green stuff in the picture is the chutney we will be making. The other thing is called a Somosa. It's an Indian stuffed pastry. The one in the picture happens to be from Whole Foods' buffet section. This one is vegan and is stuffed with potatoes and peas.


What do you need?

- Fresh Coriander (2 bunches)
- Fresh Mint (1 small bunch)
- Garlic (2-3 cloves)
- Red Onion (One)
- Tomatoes (Two medium sized)
- Lemon (one)
- Basic spices (salt, chile pepper, etc)
- Green Chile (one)
- And a blender!

How to go about this?

I am a fan of simple. I don't like to work too hard to make good food :) So this process is very much to my liking.

1) Wash your coriander and mint leaves thoroughly

2) Separate out the coriander leaves from the stems. You don't have to be precise but just take out the bulk of the stems.

3) Do the same with the Mint leaves. Mint leaves are easier to separate as the leaves are a bit larger in size.

4) Blending time! Throw in the coriander leaves and mint leaves in the blender. You have may to do these in batch depending on the number of bunches you are using.

5) Blend till it becomes puree-like.

6) Throw in big slices of onions and tomatoes. And blend again till its puree like and until all chunks blended.

7) Peel and dice garlic.

8) Dice one green chile pepper.

9) Throw in garlic, green chile, salt (1 tbsp) and a dash of red chile powder.

10) Run the blender so it mixes up well.

That's all folks!

Quick tip: At this point the chutney is done. If you made a big batch, then I would suggest you store some in the freezer. For the part that you are not freezing, squeeze in a whole fresh lemon and mix it well. Adding lemon juice reduces the longevity of the chutney adds flavor to it.

There are variety of ways you can enjoy this chutney. This is a great summer side food. I use the chutney instead of mustard or ketchup when making sandwiches.

Enjoy!

Saturday, August 6, 2011

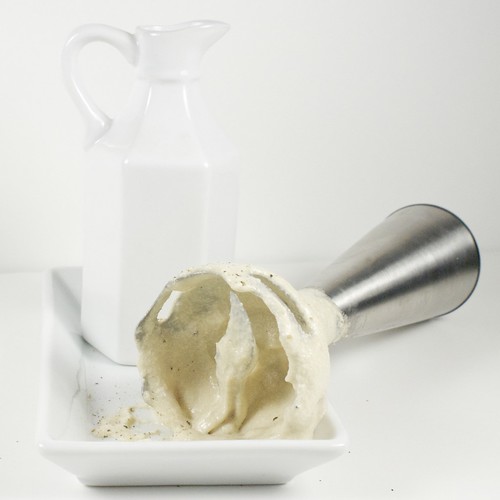
Recipe: Cashew Cream Sauce


Today's recipe comes from one of my favorite bloggers who calls herself "The Selfish Vegan". She has an amazing collection of recipes on her site. If you are a Vegan, I suggest you add her to your twitter page and bookmark her website.

She wrote this recipe so I am going to point to her web page. But before you go over to her site, make sure you try this sauce with the Sunshine burgers. I wrote about them in an earlier blog.


Click here for the recipe